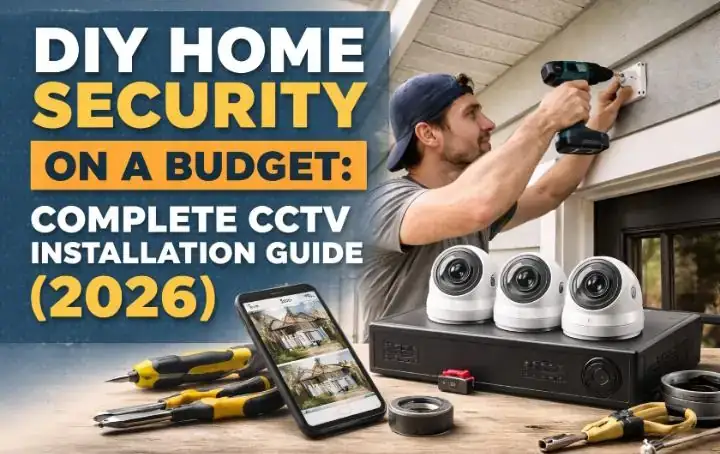
DIY Home Security on a Budget: Complete CCTV Installation Guide (2026)
I’ll be honest with you — the first time I tried to install a CCTV camera, I made every mistake possible. I bought the wrong camera, mounted it too low, forget about DIY Home Security on a Budget, forgot about night vision, and ended up with blurry footage of my own fence. It was frustrating, expensive, and completely avoidable.
That experience pushed me to spend the next several months researching, testing, and installing cameras across different home types. What I discovered changed the way I think about DIY home security on a budget. You do not need to spend thousands on a professional CCTV system. With the right knowledge and the right equipment, you can set up a system that works just as well — sometimes better — for under $300.
This guide covers everything I wish someone had told me before I started. From choosing the right camera to mounting it correctly, setting up recording, and avoiding the mistakes that cost me time and money. By the end of this, you will have a clear plan to install your own CCTV system without calling a professional or emptying your wallet.

Why CCTV Is the Most Visible Deterrent You Can Buy
Before I talk about installation, I want to address something most guides skip. CCTV cameras do not just record crime — they prevent it. A study by the Urban Institute found that visible security cameras reduced burglary rates significantly in residential areas. Burglars make quick risk assessments. When they see a camera, most of them simply move on.
That means even before your camera records a single second of footage, it is already doing its job. This is why placement matters as much as the camera itself. A camera that can be seen from the street is worth more than three cameras hidden in corners.
I learned this the hard way when I initially hid my cameras under the eaves thinking it looked cleaner. Once I moved them to more visible positions, I noticed a change — a car that had been slowly driving past my street every evening stopped showing up. Coincidence? Maybe. But I have heard similar stories from enough homeowners to take it seriously.
Before spending any money, I recommend using the free Home Burglary Risk Score tool to understand exactly how vulnerable your home is right now. It takes less than 5 minutes and gives you a clear picture of where to focus your security efforts first.
How to Choose the Right CCTV Camera on a Budget
This is where most people go wrong, including me on my first attempt. There are hundreds of cameras available at every price point, and the marketing language is designed to confuse you into buying more than you need. Here is what actually matters:
What to Look For in a Budget CCTV Camera:
- Resolution: Minimum 1080p (Full HD). Anything below this and you cannot identify faces clearly
- Night vision: Look for infrared (IR) night vision with at least 30 feet range
- Weather resistance: IP65 or higher rating for any outdoor camera
- Field of view: 90 to 130 degrees covers most entry points without blind spots
- Power source: Wired cameras are more reliable; wireless cameras are easier to install
- Storage: Local storage (SD card or NVR) avoids monthly subscription fees
- Two-way audio: Useful but not essential at the budget level
- Motion alerts: Sends a notification to your phone when movement is detected
For budget cameras in 2026, I have tested options from Amazon’s security camera section ranging from $25 to $80 per camera. The sweet spot for quality versus price is between $35 and $60 per camera. Below $25, the build quality tends to fail within 12 months. Above $80, you are paying for brand name rather than meaningful performance improvements.
Budget CCTV Camera Comparison (2026)
| Camera Type | Price Range | Best For | Main Drawback |
|---|---|---|---|
| Wired Bullet Camera | $25–$50 | Driveways, fixed entry points | Requires cable routing |
| Wireless WiFi Camera | $35–$70 | Renters, flexible placement | Needs strong WiFi signal |
| Solar Powered Camera | $45–$90 | Remote areas, no power nearby | Needs direct sunlight |
| Battery Powered Camera | $40–$80 | Easy install, no wiring | Needs regular recharging |
| NVR System (4 cameras) | $120–$250 | Full home coverage | More complex setup |
How Many Cameras Does Your Home Actually Need?
I get this question constantly. The honest answer is: it depends on your home layout. But here is a simple starting point that works for most homes:
Minimum Camera Coverage by Home Type:
- Studio or 1-bedroom apartment: 1 to 2 cameras (front door + main window)
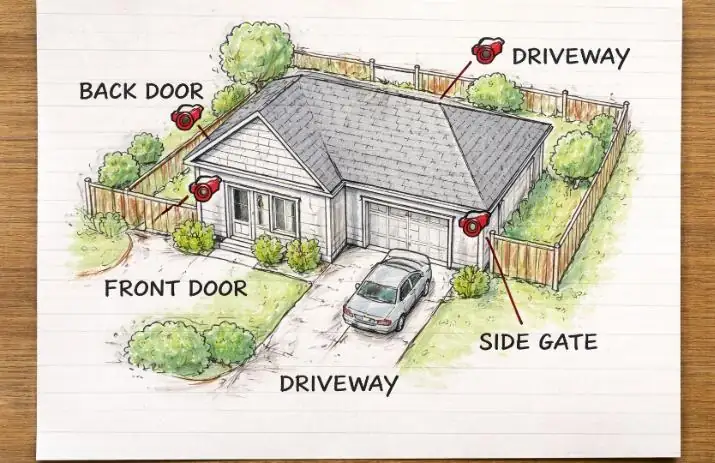
- 2 to 3 bedroom house: 3 to 4 cameras (front door, back door, driveway, side gate)
- Large family home: 4 to 6 cameras (all entry points + garage + backyard)
- Home with garage or shed: Add 1 extra camera covering the garage/shed door
Not sure how many cameras your specific home needs? Use the free Home Vulnerability Scanner to identify every weak point in your home — it will tell you exactly which areas need camera coverage and which areas you might be overlooking.
Step-by-Step CCTV Installation Guide for Beginners
I have broken this down into the simplest possible steps. I am assuming you have zero technical experience. If you have installed anything before — even a picture frame — you can do this.
Step 1 — Plan Your Camera Positions Before Buying Anything
Walk around your home with fresh eyes. Ask yourself: if I were a burglar, where would I enter? Write down every entry point — doors, ground floor windows, garage, side gates. These are your camera priority spots. Sketch a rough floor plan and mark where each camera will go. This step alone saves most people from buying the wrong number of cameras.
Step 2 — Check Your WiFi Coverage Outdoors
If you are going wireless, take your phone to each camera position and check signal strength. If your signal drops below two bars, your camera will disconnect constantly and miss important footage. Fix weak signal first — either by moving your router, adding a WiFi extender, or choosing wired cameras for distant spots. I made this mistake on my garage camera and spent two weeks troubleshooting before realizing it was simply too far from my router.
Step 3 — Mount Your Cameras at the Right Height
The correct mounting height is between 2.4 and 3 meters (8 to 10 feet). This height is high enough that someone cannot easily grab or cover the camera, but low enough to clearly capture facial features. Angle the camera slightly downward — about 15 to 20 degrees. Pointing it too far down only shows the top of people’s heads. Pointing it level shows too much sky and not enough action.
Step 4 — Install the Mounting Bracket
Most budget cameras come with a mounting bracket, screws, and wall anchors. Use a pencil to mark your screw positions. For brick or concrete walls, use a masonry drill bit — a regular drill bit will not penetrate these surfaces. For wood siding or timber, any standard drill bit works. Tighten the bracket firmly. A loose bracket means a shaky camera, and shaky footage is useless for identification.
Step 5 — Connect Power and Set Up the App
For wired cameras, run your cable through the wall or along external cable conduit (available at any hardware store for about $5). For wireless cameras, simply insert batteries or connect the solar panel. Download the manufacturer’s app, follow the setup wizard, and connect your camera to your WiFi network. Name each camera specifically — “Front Door,” “Back Gate,” “Driveway” — not generic names like “Camera 1.” You will thank yourself at 2 AM when an alert goes off.
Step 6 — Configure Motion Zones and Alerts
This is the step most beginners skip — and then they get flooded with useless alerts every time a car drives past. Inside your camera app, set a specific motion detection zone covering only your property — not the street, not a neighbor’s yard, not a tree that sways in the wind. A well-configured motion zone means every alert you receive is worth checking. I set mine to cover only my driveway and front path, and my false alerts dropped by about 90 percent overnight.
Step 7 — Test Your Footage Day and Night
After setup, walk in front of every camera yourself. Check the live feed on your phone. Then wait until after dark and walk in front of each camera again to check night vision quality. If the image is grainy or dark, adjust the camera angle away from any direct light source — streetlights and porch lights can wash out night vision if they shine directly into the lens.
How to Store Your CCTV Footage Without Paying Monthly Fees
Cloud storage sounds convenient until the monthly bill arrives. Most cloud plans charge $3 to $10 per camera per month. For a 4-camera system that is $144 to $480 per year — just for storage. Here are the free and low-cost alternatives I use instead:
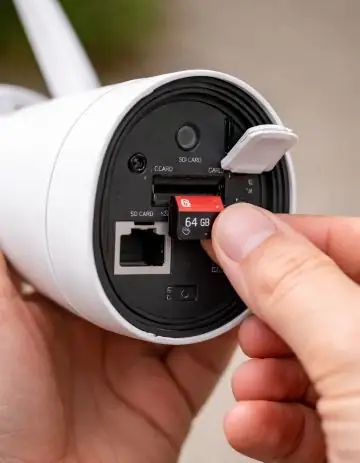
- MicroSD Card (Local Storage): Most budget cameras accept a 64GB or 128GB SD card ($8 to $15). Footage records directly to the card and overwrites the oldest footage when full. No subscription needed.
- NVR (Network Video Recorder): A central box that records all cameras simultaneously to a hard drive. A basic 4-channel NVR with a 1TB hard drive costs around $80 to $120 and stores weeks of footage.
- USB Hard Drive: Some camera systems allow you to plug a USB hard drive directly into the base station for expanded local storage.
- Free Cloud Tier: Many cameras like Reolink and TP-Link Tapo offer limited free cloud storage (24 to 48 hours of motion clips) with no subscription required.
My personal setup uses SD cards for each camera plus a basic NVR as backup. Total extra cost: about $60. I have not paid a single monthly storage fee in over a year.
Mistakes I Made That You Should Avoid
I made every mistake in the book so you do not have to. Here are the ones that cost me the most time and money:
- Mounting too low: My first camera was at 1.5 meters. Someone knocked it sideways with a bag while walking past. Always go above 2.4 meters.
- Ignoring WiFi signal: Spent two weeks troubleshooting a camera that kept going offline. The problem was simply weak WiFi signal at that corner of my house.
- Pointing at a light source: My back camera faced east. Every morning the sunrise completely washed out the image for two hours. Reposition cameras away from direct sunlight.
- No motion zone setup: I got 200 notifications on my first day because the camera detected every car on the street. Spend 5 minutes setting up motion zones.
- Forgetting firmware updates: Old firmware has security vulnerabilities. Update your camera firmware every few months through the app.
- Buying cameras without checking compatibility: I once bought 4 cameras that could not connect to a single app. Always check that all your cameras use the same platform before buying.
Complete Budget CCTV System Cost Breakdown
Here is exactly what a complete DIY CCTV system costs when you do it right on a budget. I have broken it down by home size:
| Item | Apartment | Small House | Large House |
|---|---|---|---|
| Number of Cameras | 1–2 | 3–4 | 5–6 |
| Camera Cost | $40–$80 | $120–$200 | $200–$300 |
| Storage (SD Cards) | $10–$20 | $20–$40 | $30–$60 |
| Mounting Hardware | $5–$10 | $10–$20 | $15–$30 |
| Monthly Fee | $0 | $0 | $0 |
| Total One-Time Cost | $55–$110 | $150–$260 | $245–$390 |
Not sure which budget level is right for your home? Use the free Home Security Cost and Setup Calculator to get a personalised estimate based on your specific home size and security needs.
Pairing Your CCTV With a Full Alarm System
Cameras alone are powerful. But cameras paired with a full alarm system are almost impenetrable for a budget burglar. The camera deters and records. The alarm responds and alerts. Together they cover everything.
If you have not already set up your alarm system, I covered the complete process in my earlier guide on DIY Home Security on a Budget: Complete Alarm Installation Guide. Reading both guides together gives you a complete picture of how to build a full security system for under $400 total.
According to research published by the Center for Problem-Oriented Policing at Arizona State University, homes with both visible cameras AND audible alarms experience significantly lower break-in rates than homes with either one alone. The combination sends a clear message that this home is not worth the risk.
❓ Frequently Asked Questions
Can I install CCTV cameras myself without any experience?
Yes. Modern wireless cameras are designed for beginners. If you can use a smartphone and hold a drill, you can install a camera. The entire process for one camera takes about 20 to 30 minutes once you know where to place it.
Do I need internet for CCTV cameras to work?
Not necessarily. Wired CCTV systems connected to a local NVR record continuously without any internet connection. Wireless cameras need WiFi to send alerts to your phone, but many will still record locally to an SD card even when the internet goes down.
How long do budget CCTV cameras last?
A decent budget camera with IP65 weatherproofing typically lasts 3 to 5 years outdoors. Cameras below $25 often fail within 12 to 18 months. Spending $40 to $60 per camera gives you much better longevity and performance.
Can my neighbor’s camera face my property?
Laws vary by country and state. In most places, cameras can legally capture footage of public areas including shared driveways or streets. However, cameras deliberately pointed at private areas like windows or back gardens can raise legal issues. Always aim your cameras at your own property and entry points only.
What is the best free CCTV app for managing cameras?
It depends on your camera brand. Reolink, TP-Link Tapo, and Annke Vision all have solid free apps that work well for budget cameras. If you use multiple brands, TinyCam Monitor on Android lets you manage different camera brands from one single app at no cost.
Final Thoughts — Your Home Deserves to Be Seen
Installing CCTV cameras was one of the best decisions I made for my home security. Not because I live in a dangerous area, but because knowing my home is covered gives me a level of peace of mind that is hard to put a price on.
The entire process is simpler than most people expect. One afternoon, a basic set of tools, and under $300 — that is all it takes to go from zero camera coverage to a fully functional system that records, alerts, and deters.
Start with your front door. Get one camera up today. Then expand from there as your budget allows. Perfect security does not happen overnight — but good enough security can happen this weekend.
Before you buy anything, take 3 minutes to check your Home Burglary Risk Score so you know exactly which areas of your home need the most attention first. It is free, takes no sign-up, and gives you a clear action plan tailored to your home.
📚 Continue Building Your Home Security System:

Borni Franklin is the founder of LotsHomeGuide and a home security researcher with over 5 years of experience studying real-world burglary patterns, property vulnerabilities, and practical protection strategies. He has tested home security products, analyzed how intruders select targets, and built free tools to help everyday homeowners assess and improve their safety. Every article on LotsHomeGuide is written from hands-on research — not recycled generic advice. Based in the USA. Read full information about Borni Franklin on our About Us page.